
Flame tests
A fiery chemistry demonstration by Senior Science Technician Paul Cook showing the different coloured flames produced by a range of metal salts.
Learning outcomes
You will be able to:
- Provide oral and written explanations of a flame test including method, results and scientific explanation.
- Identify metal salts based on their flame test results.
You will need (per demonstration):
- 1 x Shallow Gratnells (F1) tray or Gratnells Art (A1) tray
- 1 x Shallow Gratnells (F1) tray
- Heat proof mats
- 4 x Borosilicate watch glass or Borosilicate beakers
- 1 x 100ml glass beaker
- 10ml Distilled water
- 1 x Long splint (or a standard splint attached to a 1m rule)
- 1 x Safety Gas Lighter
- 4 x Metal spatula
- 1 x 10ml plastic pipette
- 3g or two loaded metal spatulas of each metal salt:
- Copper (II) Chloride
- Sodium Chloride
- Lithium Chloride
- Strontium Chloride
- 6ml (24ml total) of Ethanol (IDA) for each metal salt – no other alcohol should be used
- Make sure Ethanol bottle is not open and 2m away from sources of ignition
- 1 x Lab Coat
- 1 x Safety Glasses
- Video recording equipment (optional)
Preparation:
- Put on your lab coat and safety glasses, tie back your hair if it is long.
- Evenly space the four watch glasses in the bottom of an empty Gratnells shallow or art tray.
- Gather all the other equipment into the second Gratnells tray so you have everything to hand.
- Set up your video recording equipment a safe distance from the demonstration.
What to do:
Take a look at our #WhatsInMyTray – Science Project – Chemical Flame Tests video on YouTube here.
Ensure all spectators and recording equipment are a safe distance away from the demonstration area. A safety screen could be used for students to view.
- Use heatproof mats to protect surfaces.
- Add 3g of Copper (II) Chloride to the first borosilicate watch glass or beaker.
- Add 0.5ml distilled water to the first watch glass using the plastic pipette.
- Add 6ml of Ethanol (IDA). Do not use another alcohol.
- Use the metal spatula to stir the metal salt and water mixture to create a solution.
- Repeat the procedure for the other three metal salts using the three remaining watch glasses. Use a new metal spatula for each metal salt to avoid cross-contamination.
- If you wish to record the reactions, press start on your recording device now.
- Light the long wooden splint using the safety lighter.
- Carefully light the metal salt solution in each watch glass, starting with the furthest one and working back towards yourself to avoid working over the flames.
- Stand well back and observe the reaction.
- Tip: You may wish to dim the lights to see the coloured flames more easily.
- Record your findings.
Results:
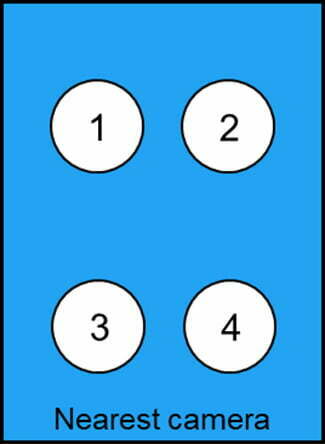
In the video, the metal salts were arranged as follows in the tray:
- Copper (II) Chloride – Green flame
- Sodium Chloride – Orange/yellow flame
- Lithium Chloride – Pink/Magenta flame
- Strontium Chloride – Red tipped flame
What is happening?
Flame tests can be used as a diagnostic tool to identify the presence of metal ions in a compound. Not all metal ions give flame colours, but for Group 1 compounds, flame tests are an easy identification method.
Strong heating (increasing energy) excites atoms and ions within the compounds, promoting their electrons from their normal (ground) state to a higher orbital. When the electrons fall back down to their lower level, which can happen in one go or in several steps, energy is released as light. Each fall releases a specific amount of energy as light, which corresponds to a particular wavelength, or frequency. A spectrum of light is produced, some of which will be visible light and the colour seen will be a combination of the different frequencies emitted.
The atomic emission spectra of each chemical effects the frequency of visible light radiation emitted i.e. the flame appears a different colour depending on the chemical added to the watch glass.
The most well-known application of this chemical reaction is in fireworks. Pyrotechnicians use metal salts in specific combinations mixed with co-solvents to dissolve the chemicals and colour enhancers (chlorine donors) to increase the brightness.
Other things to try…
- Are there other metal salts that you could test? Research the Group 1 elements plan further flame tests you could run. Discuss your ideas with your teacher or technician to set up a second demonstration. Be sure to work carefully and within CLEAPSS guidelines.
- Ask for an unknown compound and use your knowledge of flame tests to identify it.
- How long does it take for the flames to stop? How could you measure this? How could you get the flames to burn for longer?
- Use a laboratory or homemade spectroscope to observe the flames, you could also make a Smartphone spectrometer using a DVD and a mobile phone camera (SSERC have a good resource on this).
- Share your flame test videos on social media using #WhatsInMyTray
Health & Safety
As with all Gratnells Learning Rooms What’s In My Tray Activities, you should carry out your own risk assessment prior to undertaking any of the activities or demonstrations. In particular, the CLEAPSS guidelines on flame tests on metal ions should be followed.