
Chromatography tray
This activity was created as part of a Gratnells What’s in my tray? CPD workshop for secondary science teachers and technicians to support practical work and delivery of the curriculum. It can be carried out as a stand-alone activity for students or combined with other activities from the session to form a STEM carousel. If you would like to find out more about running this activity as part of a carousel, take a look at the CPD Workshops section of the Gratnells Learning Rooms website where you will find further details and example carousels.
If you need to get a whole class of students doing paper chromatography in the same lesson with the minimum amount of equipment, this activity is for you! Simple, effective, colourful, safe and easily accessible practical chemistry using the most simple reagents.
Learning outcomes
You will be able to:
- Work scientifically to apply scientific knowledge and understanding to answer questions, record observations, use apparatus, interpret data and draw conclusions.
- Perform a simple technique for separating a mixture of substances.
- Distinguish between pure and impure substances.
You will need (for 5 groups of 4 participants rotating in a carousel):
- 2 x Translucent deep Gratnells (F2) tray with lid
- 1 x Shallow Gratnells tray with lid
- 1 x Office tray insert
- 6 x 30cm ruler (one per group plus one for setting up the chromatography)
- 8 x Differed coloured fat nib felt tip pens (water-based). We used Berol Colour Broad Pen 1.7 mm Nib, Assorted Colours.
- 1 x Pencil
- 1 x Roll of clear sticky tape
- 1 x Scissors
- 10 x 10x12cm sheet Whatman chromatography paper 1 CHR (Cat. No. 3001-845) (two per group, although you may also wish to have some spares ready)
- 3200ml tap water
- 1 x Measuring jug for tap water
- Absorbent cloths in case of water drips
- 1 x Whiteboard pen (for set up use only)
- 1 x Instruction sheet and tray label
- 1 x Question sheet
- Pen and/or a tablet with camera for recording your answers.
This activity also works for individuals or smaller groups, just increase the amount of time allocated to complete it. If only one team or individual is taking part, you will only need two rulers and two pieces of chromatography paper. Once prepared, this activity can be repeated multiple times, using the equipment listed for up to a maximum of five groups. The chromatography paper and tap water is the only consumable, the rest of the equipment can be reused.
Preparation:
- Fill one deep tray with 3200ml tap water.
- Mark the rim of the tray at regular intervals using the whiteboard pen to indicate ruler placement locations and put the lid on until just before the session starts (to decrease evaporation and risk of spills).
- Put the empty deep tray next to the tap water tray. This will be the drying tray.
- Trim the chromatography papers to the size needed and put two sheets into each of five labelled envelopes (one envelope per group, two sheets per envelope). Keep some spare pre-cut papers to one side.
- Write team numbers on the rulers. i.e. Team 1, Team 2 and so on.
- Organise the rulers, felt tip pens, pencil, sticky tape, scissors, and cloths into the office insert inside the shallow tray and put the lid on.
- Print and laminate (optional) one copy of the activity instructions or view on any device.
- Print and laminate (optional) one copy of the ‘Chromatography Tray’ label and use it to label the tray with water in it. Or, write ‘Chromatography Tray’ on end of the tray with the white board pen.
- Print one copy of the question sheet per group or view and edit on any device.
What to do:
- Work one group at a time (set up takes approximately 5 minutes per group).
- Remove the tray lids.
- Pick a ruler with a team number written on it and place it on a table in landscape orientation. Note your team number on your question sheet.
- Open one envelope and take out the two chromatography papers. Handle them carefully by their edges.
- Turn the papers to portrait orientation and put them down on a clean and dry table below the ruler.
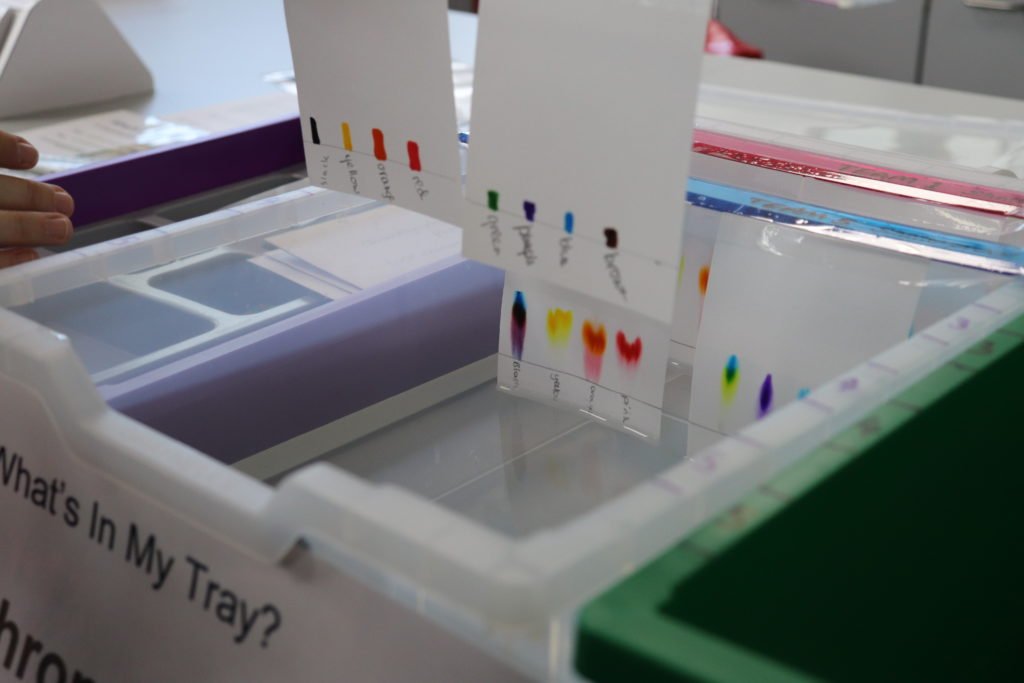
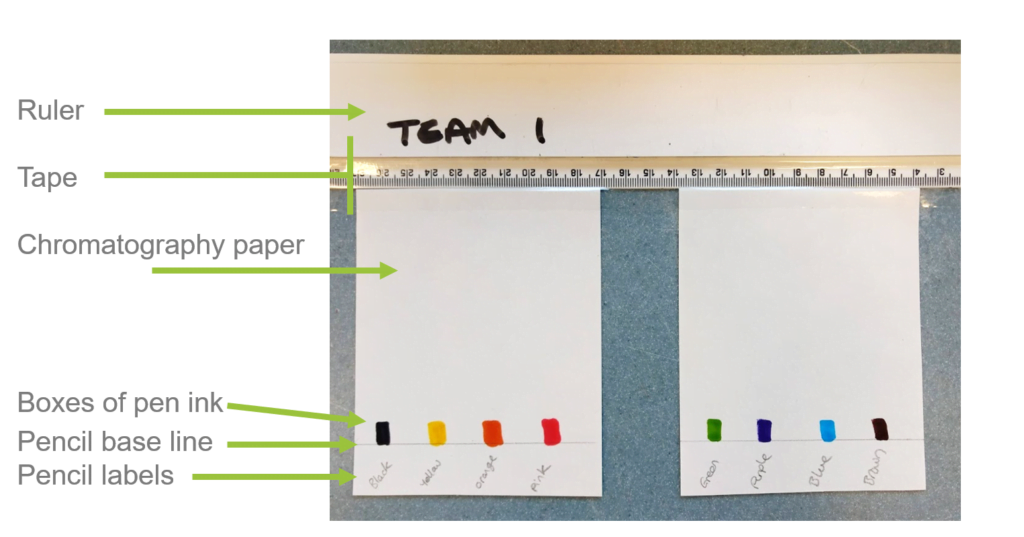
- Use the labelled image provided as a guide for the next steps.
- Place the two papers next to the ruler’s edge. The top of the paper should just touch the bottom edge of the ruler. Leave a ~2cm gap in between the two sheets.
- Use a single strip of clear tape to attach the top of both papers to the ruler.
- Use another ruler to draw a single pencil line across both papers 2cm up from the bottom edge. This is your base line.
- Draw one ~1cm x 0.5cm box of each pen colour at evenly spaced intervals just above the pencil line. Put four boxes on each paper so there are eight in total.
- Label each colour using a pencil (write below the pencil base line).
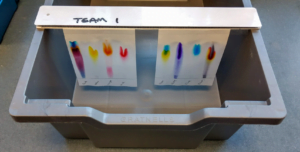
- Take your prepared chromatography papers and ruler over to the chromatography tray. The tray has been prepared in advance and contains tap water.
- Lower the papers carefully into the tray. Rest the ruler on the marked edges of the tray. The bottom edge of the papers should just touch the water.
- Observe what happens.
- Answer questions 1 to 5 on your question sheet. You may have to check back later on the chromatography results to be able to answer all the questions.
Tidy up time:
- Leave your chromatography sheets running and nominate one team member to come back and check on them every few minutes. When the solvent front gets to within 2cm of the top of the paper, lift your ruler out, put it into the adjacent, empty, drying tray and observe the results. It takes around 15 minutes for the chromatography to run and provide the separation necessary to be able to answer all the questions.
- Wipe up any drips or spills as they occur using the cloths provided.
- Organise the rest of the equipment back into the office tray insert, leaving it tidy for the next participants.
- Put the lid on and put the instruction sheets and activity name sheet on top.
When all participants have completed the activity, swap answers with another group and mark the answers as the activity leader reads them out or hand your answers to the activity leader for marking.
Example blank question sheet
Answers
Please note, answers will differ depending on which brand and colour of felt pen is used. It is always advisable to do a test run with your chosen brand of pen ahead of the session and to make a note of your answers. Manufacturers change the formulation of their inks over time, do not assume a new batch of pens will provide the same answers as the old batch. The answers below relate to the photographs provided here.
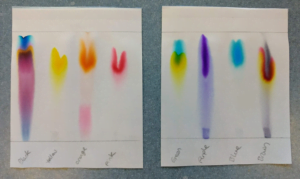
Q1. Which pen colours are pure?
A1. Yellow, Pink, Purple, Blue
Q2. Which pen colours are impure?
A2. Black, Orange, Green, Brown
1 point per correctly allocated colour.
8 points available.
Q3. What have we used as the mobile phase?
A3. Water
Q4. What have we used as the stationary phase?
A4. Chromatography paper
Q5. Why did we use pencil?
A5. Pencil is insoluble and does not interact with the mobile phase
1 point per correct answer. 3 points available.
What is happening?
Key words: Paper chromatography, stationary phase, mobile phase, pure, impure, separation.
Paper chromatography is an analytical chemistry technique for separating dissolved substances (liquids). The method separates the components of a sample based on their different rates of migration across a sheet of paper. The chromatography paper is known as the stationary phase, i.e. it doesn’t move. The water (solvent) is known as the mobile phase. The solvent moves through the paper by capillary action. As the solvent front moves up the paper, it carries the various components of the sample with it. The solubility of each component in the solvent determines how quickly it is transported. Solubility is determined by polarity. Different components have different molecular compositions and therefore different polarities. The most soluble (higher polarity) components are transported more quickly and will appear towards the top of the solvent front, the least soluble (lower polarity) components will be transported more slowly and will be left behind. In an impure substance, the various components will be separated based on their solubility. When using water, which is very polar, as the solvent, the more polar the colour the higher it will rise on the chromatography paper.
In the example images provided, for the orange pen sample, you can see it has two pigment components. The orange pigment is the more soluble and appears towards the top of the paper, the pink pigment is least soluble and appears towards the bottom. The two components have been separated based on their solubility and you can clearly see that the orange sample is an impure colour. The two colours are not appearing as a result of a chemical reaction, it is just a separation. This method is known as one-way chromatography.
If one-way chromatography does not fully separate the components of a sample, the paper can be turned 90 degrees and the process repeated using a different solvent. This method is known as two-way chromatography.
Paper chromatography can be used to separate a wide range of complex mixtures, such as amino acids, peptides, carbohydrates, and a variety of other organic compounds and inorganic ions. It can also be used to identify the components of an unknown mixture if appropriate, known, control samples are run alongside the unknown sample. Colourless samples can also be analysed by this method if combined with a final ‘development’ process at the end using a reactive dye or luminescent liquid.
Other things to try…
- Set up time-lapse photography or a video recorded on a tripod to record the chromatography as it happens.
- Research Rf values. Use your results to calculate the Rf value of each component pigment. What do you notice? Which pigments have been used to create each of the impure substances?
- Repeat the activity using the same colours but from a different manufacturer. Compare the results of the two tests, what do you observe?
- Gather an assortment of black pens from different manufacturers, repeat the activity using these pens. What do you notice? Have any of the samples not travelled up the paper? Why? How could you analyse the pigment composition these samples? Clue – investigate other solvents to use as the mobile phase.
- How could this technology be applied in the real world? Clue – think CSI.
- This method is also used to determine what natural or artificial colouring is present in food and drink. You could try this method with samples of food colouring from a bottle, or you could extract and concentrate your own samples from colourful foods or drinks. You may need to experiment with different solvents to get the best separation.
- Share your chromatography photographs and videos on social media using #WhatsInMyTray.
Health & Safety
As with all Gratnells Learning Rooms What’s in my tray? activities, you should carry out your own risk assessment prior to undertaking any of the activities or demonstrations. In particular, risks from collisions and needles should be considered.